
If you are completely new to Powder Coating, I recommend that you start off by getting a beginner powder coating gun. These are priced at less than $200. After you have that, you can try it out and see if it's something you want to pursue. This post will talk about some good powder coating guns you can start out with, but first take a look at some of the other equipment and supplies you will need:
Clicking the links will take you to the appropriate article on this site
Powder coating gun - Read about them below in this post.
- Oven
- Powder
- Something to powder coat
- Air Compressor (Unless you use the Craftsman powder coating gun)
- Non-contact Infrared Thermometer
- Grounding Rod
- Media Blaster
- Powder Coat Stripper - for WHEN you mess up.
- Degreaser & Soap
- Masking supplies: plugs, high-temp tape, blue painters tape, etc.
- Denatured Alcohol
- Disposable Gloves
- Respirator
Powdercoatguide.com is a participant in the Amazon Services LLC Associates Program, an affiliate advertising program designed to provide a means for sites to earn advertising fees by advertising and linking to amazon.com.
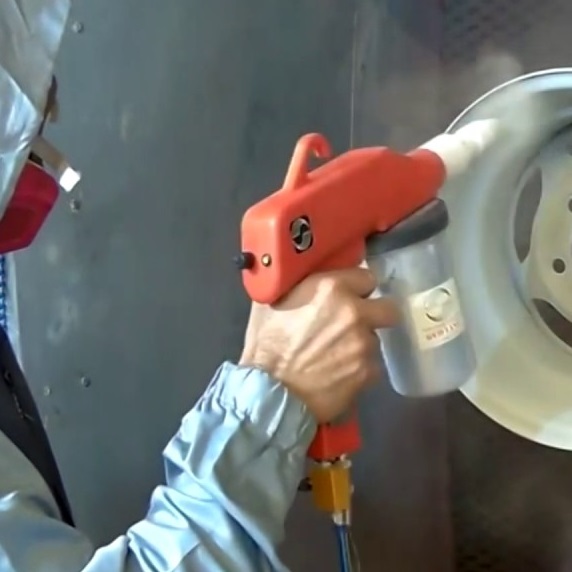
Powder Coating Gun
The powder coating gun serves the purpose of electrically charging the powder and propelling it towards the parts you are powder coating. The amount it charges the powder is measured in KV/kilovolts (1,000 volts = 1 kilovolt). Cheaper guns have a pre-selected KV and more expensive guns allow you to choose. Powder coating guns range from $80 airless powder coating guns to $3,000+ for the professional powder coating setups like Wagner, Nordson, and Gema. If you already have a powder coating gun, read this article make sure you are using the correct spraying techniques.
Craftsman Powder Coating System: (No Air Compressor needed)
I will start with the cheapest possible gun to get you coating. It is the Craftsman Powder Coating System. You can see my full review here: Craftsman Powder Coating System Review
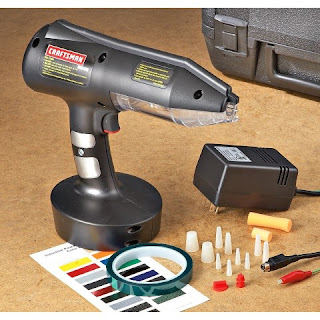
The Craftsman gun is the only powder coating gun that does not require an air compressor. If you are interested in this gun because you don't have a compressor, also see Alternatives to Sandblasting since you would need an air compressor to do any sand blasting.
For the beginner, this Craftsman powder coating gun performs well and is cheap enough to let you know if you would like to pursue powder coating. This was the first gun I bought and I used it to produce a lot of very nice finishes:
 |
| Brake Caliper Coated with the Craftsman Powder Coating Gun |
I would call this gun under-rated. Powder coating forums will generally look down on it and it has some bad reviews because there is a part on the gun that breaks for even using a feather-lite touch. If you want to try out powder coating without spending much money, don't worry about that stuff. This gun has limitations, but the biggest limitation as a beginner will be your experience. The piece that breaks is a lock to hold the cup in, however it isn't really necessary. My cup has never fallen out even without the lock.
The gun is very easy to use. I do not suggest using the ground wire that comes with the gun, but instead using a stand-alone grounding rod (explained here). The ground rod method should always be used instead of the guns ground, regardless of gun.
The clear plastic cup has a couple issues:
- It does not hold much powder. One cup can almost coat a 16" wheel before needing refilling.
- The lid on the gun fits so tightly that if there is any powder on the lip, the lid will not tighten. To resolve this, I use a spoon to scoop powder into the cup, trying not touch the sides, then I use a small clean dedicated paintbrush to brush off any powder in the grooves on the lip before I tighten the lid. This brush is only used for this purpose and otherwise is kept in a resealable baggy to keep it clean. You don't want to introduce contaminants into your powder cup with a dirty brush.
After you manage to get the powder in the cup, you simply slide the cup onto the gun, plug the gun in the wall, attach the grounding rod to the part you are coating and you are ready to go.
There is a metal electrode that protrudes from the nozzle of the gun that charges the powder. This electrode will get coated with powder which will reduce the transfer efficiency of the gun, resulting in more powder on the floor than on your part. Clean the electrode frequently with a clean paint brush or towel.
It may seem like I mentioned quite a bit of defects about this gun, but really, after you get used to it, it works decent enough. When comparing it to the price of other powder coating guns, you can see that it serves as an excellent introduction to powder coating. You can begin coating your own parts without a huge investment. Just keep in mind that this gun has no place in a professional powder coating shop, except maybe shooting some color sample panels.
It also comes with some masking plugs and a roll of high-temp tape, but you will find that you will want a larger selection than what his included.
Harbor Freight Powder Coating Gun
The next price up is the Harbor Freight Powder Coating Gun. I have never used this gun but I have found that all of Harbor Freights tools fall into one of two categories: great deal or absolute garbage. You can quickly determine which one it is by the reviews on their website. Considering this gun has a 5 star review, I would say it is a good powder coating gun for a beginner. If you are not close to a Harbor Freight, you can also get the gun on Amazon here: Chicago Electric Powder Coating Gun.
Eastwood Powder Coating Guns
The next is Eastwood's line of guns, they have a Hotcoat Starter and a dual voltage powder coating gun. You remember I mentioned adjustable KV (kilovolts) above, well the dual voltage gun offers you the adjustment of two different voltages which comes in handy when you are shooting two coats. Eastwood also sells their guns in a line of starter kits that come with plugs, tape, and assorted powder colors. They also come with Eastwood's instruction manual, a manual which you should ignore for the most part as the information skips a lot of important details. The Eastwood powder coating gun is the most popular gun for new powder coaters and it does work considerably better than the Harbor Freight powder coating gun and the Craftsman powder coating gun mentioned above.
Hotcoat Dual Voltage Gun:
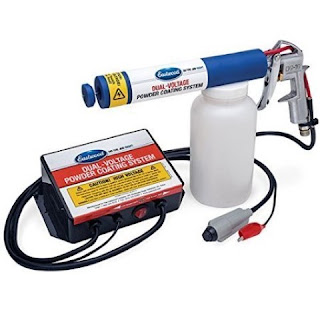
This gun has two preset voltages for you to select. Normally you would use two different voltage settings when you are doing two separate coats, however both of the settings on this gun are low to begin with so the main advantage is that it has a higher voltage of 25kv to shoot larger parts such as wheels or sheet metal. All of the other above-mentioned guns have around a 12-15kv settings that are not adjustable. Basically,the higher the KV, the more your powder will be attracted to the part, until you set it too high and the powder actually bounces off the part. An example of a high KV setting would be over 90kv.
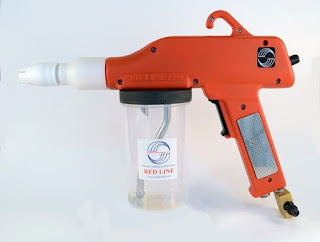
Redline EZ-50 Powder Coating Gun
If you purchase a Redline EZ-50 gun and the power adapter does not have a ground prong, then the gun must be grounded using a dedicated grounding rod using the alligator clip supplied with the gun. Without this gun being grounded to a grounding rod, there have been reports of it shocking the user.
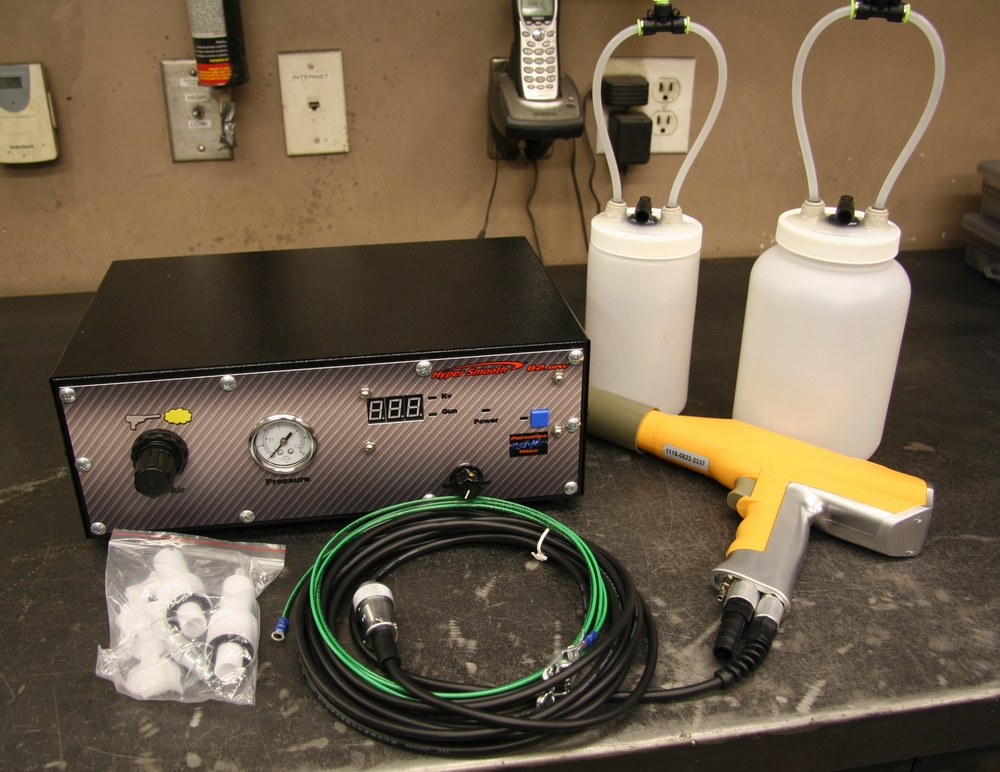
Hyper Smooth Powder Coating Guns
The Hyper Smooth 02 or Hyper Smooth 03 powder coating guns are pretty much the last rung on the ladder before moving onto professional-level guns. These guns are great for the serious hobbyist or a lower volume powder coating shop. The Hyper Smooth guns easily apply multiple coats, up to 15 coats according to some. If you select the DPW model, can shoot powder into very difficult Faraday areas. The transfer efficiency is also much better than the lower level guns. This not only means that you will waste less powder, it also means a cleaner shop as more of your powder will end up on the part and not in the air or on the ground. The Hyper Smooth guns are very similar and comparable to the Kool Koat guns sold by Columbia Coatings as they share the same electronics inside and come with the same actual gun.

There are several versions available of the Hyper Smooth range:
The main distinction is the 02 or 03 model and the difference between the two is that the 03 has a separate regulated auxiliary air-out line to connect to a fluidized hopper. A fluidized hopper is a type of hopper that has an air source connected to it and the air flow through the powder continually mixes and sifts the powder. The powder in a fluidized hopper is so fine that is resembles a liquid as it is moving around. Fluidized hoppers ensure that the powder you are spraying is as consistent as it can be with no clumps and an even distribution of all of contents of the powder. For the best powder coating results, a fluidized hopper is a must, and therefore the 03 models would be the one to go with. However, the 02 model will save you some money and you can still use a fluidized hopper, you will just need to construct your own hopper with a separate air source.
Within the 02 and 03 range, there is the "LED" and the "DPW"models. The "LED" is the basic model while the "DPW" which stands for Digital Pulsation Wave, has a move advanced board that makes shooting Faraday areas easier. Below is a visual comparison of the 02 and 03, DPW and LED models.

This article covers most of the beginner and intermediate guns but I will cover the professional guns ($3,000+) in later posts.
Hey man, It's SidVicious from the Vortex. I'll likely be picking up the Dial Voltage Eastwood gun soon. Do you think it'll work alright with a cheaper 'portable' air compressor? Looks like it takes low pressure- 5-10psi according to the Eastwood website.
ReplyDeleteHey, crazy your asking this, I just started working on an air compressor article. I looked at the Eastwood guns requirements and it only needs 1cfm at 5-8psi. Almost any air compressor would be able to supply enough air for that. Just check the specs on your compressor or the one you are planning on getting to make sure. How do you plan on preparing the parts? Sandblasting does take a decent sized compressor.
DeleteThanks for the comment, glad to see you are getting started.
I am a regular user of the powder coating guns. Where at first I am not aware of how to mix the powder and then with the help of one of my friend who is working in a powder coating company told about this powder coating gun and now it was very easy for me to use and to apply.
ReplyDeleteHi. Would like to know more about item 12 (Denatured Alcohol) and item 15. Pre-treatment processes (iron phosphate, zirconium phosphate, zinc phosphate, zinc electroplating, zinc galvanizing).
ReplyDeleteRegarding Item 15, my understanding is that is used for adhesion purposes and a protector. So relative to adhesion, when you media blast you create a "profile" and allows the powder to "bite". So from the adhesion perspective, I'm thinking it may not be necessary?
Now from the protector perspective, I can see the benefit of using zinc or iron phosphates on mild steel and aluminum its respective applications listed above. So here are my questions:
1. Is it best practice to coat the part with a phosphate (zinc creates more sludge versus iron phosphates but has its purposes)?
2. I understand there are regulations around handling these products and are there some DIY friendly chemicals we can use?
3. After the phosphate dries, you rinse with water, but do you Outgas again, prior to powder?
Would love more insight here. Thanks.
Good questions Tom, (the reply will be separated into 2 comments)
DeleteDenatured alcohol (item 12) is used as a final cleaner after the part is sandblasted. It leaves no residue so it is a great cleaner before powder coating. Depending on who you ask, it is not 100% required. I used to use it to clean every part post sandblasting. However when using it to clean, whatever towel I used (no matter how lint-free they claim to be) I would have lint on my part that was very difficult to remove. The blow gun does not remove the lint. I would then go over the parts with a handheld torch to burn off the lint. Eventually, I started to exclude this step from my process to avoid the lint issue and have noticed no negative effects. Now I only keep the denatured alcohol on hand in case of an accident like a drop of sweat hitting the part while I am masking. Then I would spot clean with the denatured alcohol. Denatured alcohol is also the easiest way for me to clean baked on powder off of silicone plugs, it literally takes it right off. Other than that, it is not a 100% required item in my opinion. I will eventually write an article on each item in that list, and I will fully expand on it. I just never seem to have enough time to sit down and write.
As for item 15, these pretreatments are not 100% required either but they will improve the final product. Sandblasting by itself is great for providing adhesion with the powder coating. The iron phosphate, zinc and zirconium phosphate pretreatments are mostly used by large powder coating companies that do not have the means to sandblast every part that they coat. By themselves, the pretreatments provide "good enough" adhesion for big companies, however sandblasting has been tested by many coaters as being much better for adhesion than just a phosphate coating. But testing done by coats has shown that sandblasting + a phosphate coating provides the best adhesion and corrosion prevention.
Taking the pretreatments further, if you have your parts zinc plated or galvanized prior to powder coating, you have double protection. Each coating is capable of protecting the part corrosion on its own, but when you double up on it, the part is very protected. If you ever chip the powder coat, the zinc plating will continue to protect the part where the chip is. Obviously this adds cost and extra steps but if you are after the longest lasting protection, a plating+powder coat is the way to go. If I were to start over on my car restoration again, I would have had all the parts zinc plated first before I powder coated them. But that is just because I am a little OCD about the restoration.
1. Best practices would also include a pretreatment, I have personally not used zinc phophates because I couldn't get my hands on it but I do know that many local companies will do the process for you and it isn't as expensive as actual plating. From talking to the chemical companies that make the stuff, the level of corrosion is said to go iron phosphate < zirconium phosphate < zinc phosphate. Zirconium phosphate is said to be very comparable to zinc but the process does not produce the hazardous waste that zinc does.
Delete2. Iron phosphate is readily available on many powder coating websites. This one Powder365 Iron Phosphate is one that I have. I do not use it on every part, I save it for parts that are subject to more abuse like the underbody and frame parts. It is not hard to use and has a simple learning curve. I use a bug sprayer wand to spray my parts with it. I will do a full article on this pretreatment.
Zirconium phosphate is also available from some chemical companies and they will sell to the average consumer. PPG actually makes zirconium phosphate and you can call to order it. I talked to them about purchasing it but decided not to.
You can zinc plate at home using plating kits from Caswell Plating or Eastwood. You can also put together a kit yourself if you can find a company that will sell you all the chemicals. However, coating large parts involves expensive power supplies and expensive chemicals. I have looked into doing it myself but decided it was cost-prohibitive. You may have a different budget than me, however. I have used my local plating companies and its not too expensive for how much I had done. They charged something like $.10/pound after I met the minimum order of $80 for zinc plating.
Galvanizing would be near impossible and unsafe to do at home as it requires dipping the part in molten zinc. This would have to be done by a local company.
3. The iron phosphate I use is a no-rinse phosphate. Once it dries, it is ready for powder coating. Any blasting will just take the iron phosphate right of. If I am doing any masking on the part, I do the phosphate before the masking process as the phosphate will protect the bare areas and it is so thin that it will not affect clearances.
If you have the part zinc plated or plate it yourself, you will want to skip the standard chromate post-treatment. Often the part will need outgassed. My plater actually bakes all of my parts anyways to relieve any hydrogen embrittlement so he takes care of the outgassing process for me. You also will want to "brush blast" your parts after zinc plating. Brush blasting is the process of blasting low air pressure(30-40psi), a greater distance from gun-to-part and at an angle of 45 degrees instead of dead on. The goal of brush blasting is to create a profile on the zinc layer without removing it.
I hope that helps you, I am not at all an expert on plating and pretreatment processes, but I have researched it pretty extensively. Like I said, none of this is required for your basic powder coat job but when you want the part to last as long as possible, the pretreatments help.
Great insight and well written! Thanks for all your help.
DeleteNo problem at all sir, Thanks for reading.
DeleteThis comment has been removed by the author.
ReplyDeleteHello!
ReplyDeleteI have/use an eastwood (single voltage) gun and allpowderpaint powders.
Im having a lot of trouble getting the desired result when using candy transparent powders,
Most parts dont come out looking like the example pics, getting a 2nd coat on is almost impossible, and since the parts Im painting have a good amount of receesed areas shooting the powder while the part is HOT leaves a very obvious difference between the recessed areas and the protruding areas.
SHOULD I GET MY HANDS ON A DUAL VOLTAGE EASTWOOD GUN?
SHOULD I GET A BETTER GUN ($200-$300)?
IS IT THE POWDERS FAULT?
While a better gun would help out a lot, it sounds like you could be facing a grounding issue. A proper grounding rod setup allowed me to do 2nd and 3rd coats even with the cheap Craftsman Powder coating gun. Spraying a part hot, while sometimes is the only way to ensure complete coverage without a professional gun, is not the ideal way to do it and usually it causes more problems than it solves. If I were you, I would first improve your grounding as much as you can and shoot the parts at room temperature. That should give you much better results. Here is my article on how to set up a ground rod: Powder Coating: Grounding Rods
DeleteHello there, You’ve done an excellent job. I’ll definitely digg it and personally recommend to my friends. I’m sure they’ll benefit from this site.
ReplyDeleteI'm looking to upgrade from the Dual voltage Eastwood gun. I want a gun that can do multiple coats and has a good feed system. Also, is there a glove you can use to handle hot parts out of the oven? Thanks!
ReplyDeleteLook into the Redline EZ50 powder coating gun. It is a big step up from Eastwoods gun and can handle multi-coats very well. A lot of pros use it as a backup gun.
DeleteHi
ReplyDeleteFYI:
The link above for the Timer is pointing to the IR Thermomiter instead
That was actually intentional. I didn't have too much to say about the timer so I put it at the end of the IR Thermometer Article. If you scroll down to the bottom, you'll see it. Thanks for the heads up though.
DeleteExcellent job! your article is indeed informative and easy to understand. For me it is more cost effective and efficient to use a high quality powder coat guns.
ReplyDeleteThanks for sharing this powder coating guns review. Very effective and useful information's in this wonderful post. I loved to reading this post and feel that it's seems like a great blog i have ever seen.
ReplyDeleteThank you for the information.The pre treatment details are quite useful.
ReplyDeleteI bought a RED LINE EZ 50 as my first gun (used ) and It is not giving a steady flow of powder , I have to tap the .bottle and it will spit the powder out . I tried adjusting the air between 15 /30 lbs that didn't help and I also tried the kv controller and the flow controller with no change on the flow. Do you or your readers have any ideas on the problem Thank you for any help and for taking the time to read this
ReplyDeleteWhat type of powder are you trying to shoot? First make sure there are no clumps in the powder. If it's not that, I would check the tips and passage ways and clean them out as thoroghly as possible. Try using lots of compressed air and a bottle brush or qtips to clean them. If that's not the issue, just get back to me on the comment section here.
DeleteI'm using powder 365 in the EZ50 land when I first started ,the gun gave steady cloud for about 20 sec. And it stopped .The flow never came back ,after cleaning the gun as well as was possible with out taking any thing apart ( don't know what supposed to come off ) I tried again only this time the indicator Lt. Didn't come on . I didn't receive any instructions on how to clean or stripping the gun down a I said before it's my first gun and I bought it used . If it has to be serviced do you know of any body in West Covina Ca .91790 area ? Any advise will be appreciated .. THANK YOU
DeleteUnfortunately, something in the gun may be clogged or broken, I have personally not experienced this so I can't be of much help. If it were me, I would definitely try calling Redline themselves and asking them what the best course of action is. They are located in India though, so there may be some translation issues. Here is there contact page: http://www.redlineltd.com/ . If you are unable to find someone there that speaks English, then I would try calling Caswell Plating as they are one of the biggest US distributors of EZ-50's. Caswell Plating phone number: 315.946.1213
DeleteLooking for a Sublimation Powder Coat. White and Clear Gloss in the US.
ReplyDeleteBandedUSA.
Has anyone tried the NordicPulver Cup Gun set-up ? is it any good ?
ReplyDeleteI know it is for small items, looking for a very fine finish Gun set .
BandedUSA
There are not many reviews for it but it is a tribo gun, most of the guns marketed in the US are Corona type guns. Tribo guns use a specific tribo powder which will be hard to find in the US because everyone uses Corona guns. With that being said, the tribo guns do a better job spraying into the Faraday cage areas of parts and I have read of people successfully using some Corona type powders in them. However they were unable to spray epoxies or metallic powders. It's up to you if you want to take the risk and test it to see if it will spray the type of powders you want to shoot. Also forget about the sandblasting feature of the gun, don't ever sandblasting and spraying powder with the same gun. I can almost guarantee you would have sand contamination in the powder if you tried.
DeleteHi Sean fantastic read. I have a problem I hope you can help me with. I have a Hyper Smooth led 2.0 Great gun without all the bells and whistles and the price is good. My issue is I keep applying way to much powder and though the parts come out great I always seem to have drips forming on the edge of the parts after curing. I am not sure but I think it may be air pressure related? The only info in the manual is to run 60 psi from compressor to back of unit. I have been ajusting the regulator on the unit for gun to output 10-12psi and the cloud of powder is massive. I have no clue what I should pressure I should be running.
ReplyDeleteThanks for any help
I haven't used that gun personalyl but I know there is a feed air setting on the box. You should be able to adjust down the powder cloud with just that. If you're bottoming out that and your cloud is still too big, I would experiment with lowering the input pressure into the box from your compressor. If you are getting runs, it is definitely too heavy of a coat and you will likely face chipping issues with those parts. Hope that helps.
DeleteYou should add a bitcoin address to your blog. You are giving out great info I would love to donate.
ReplyDeleteI have a single voltage eastwood gun. Is impossible to apply double coat with this gun . I use your guide to have better ground. which will be my problem?
ReplyDeleteplease help me
People have successfully applied 2 coats using the eastwood gun. The best aid with this is using a grounding rod attached to your parts. I think that is what you are saying you already did? If you are still having issues, make sure that your grounding point on your part is down to clean bare metal. If the part is entirely coated already, it is good to use a very small file on the inside of a hanging hole to remove enough powder for your hook to be touching bare metal. From there, you should try to spray any of the faraday areas first, then make sure you keep a good distance from the part with the gun as you coat the rest of the part. You should be able to coat it this way.
Deleteeastwood single voltage use 9000 volts... eastwood dual voltaje use 15000 and 25000, thats my problem?
DeleteI've done everything you say and i cant apply 2 coats. Im desperate.
Unfortunately, there is no clear cut answer for this, the problem lies either in your ground, your gun, or your powder. The best thing to do at this point is to experiment. First, rule out the powder, sometimes older powder will loose its ability to hold a charge, if your powder is old, try out some fresh powder to see if that is the issue. Older than a year would be considered old. Try out a completely different powder on a scrap piece of metal and try to do 2 coats.
DeleteIf you are having the same issue with multiple powders, move onto the gun. Lower the air pressure going to your gun. Position your gun further from the part, and try shooting the part by not directly aiming at the part, meaning try spraying diagonally in front of the part aiming about halfway off of the part. These methods have definitely helped me when using the Craftsman gun. The dual voltage gun would not help you in this case, lower kv's are better for multiple coats. Another possible issue may even be the gun is defective. However, we will rule that out as the last possible problem.
If you are still having no luck, move onto the ground. Try soaking the area around your grounding rod with water an hour before coating. Moist ground is best for a grounding rod. If that doesn't help then there may be an issue with your connection from the grounding rod to your part somewhere along the line, try just using the gun clip and not the grounding rod and see what the result is. If you are still experiencing the same result, then try removing the ground all together. Also during each one of these tests, try holding the corner of your part with a clean hand while coating, sometimes this helps attract powder.
One of the above methods should allow you to spray multiple coats, you'll just have to take some time to figure out what works best for you. The first thing I would try though is verifying the connections between your grounding rod and your part. Look for any corrosion on the wiring contacts and clean them off if needed. If you have a multimeter, make sure you have continuity between the grounding rod and the part. After that, really soak the area around your grounding rod, lower the air pressure on your gun, and try coating again.
If none of that works, it may be the gun. How is the attraction of powder on the first coat? If you were to direct your gun right beside your part, you should notice that the powder is still attracted and clinging to your part. Let me know if any of that helps.
Hi. Im wondering why it seems so much harder to coat the welds on my parts
ReplyDeleteIf the welds are in corners, then you are experiencing what is called a faraday cage. It happens in tight corners and crevices and these areas are harder to get powder to stick to. The best way to overcome it is by using a grounding rod, check out the article on this site titled "How to properly ground your parts". The more efficient ground will allow the powder to stick in the faraday areas much better. Also lowering the air pressure on your gun when shooting these areas also helps.
DeleteSean great site thanks for sharing all the information. Want to start powder coating Yeti cups woukd the craftsman gun be ok for small jobs like the cups? Also what do you think of the Eastwood oven? Price seems good at just over 100.00 and size should be ok for the cups close to 8 inches tall. I would you suggest grounding on the cups? I was thinking a magnet on the bottom attached to the grounded hook?
ReplyDeleteThanks again for a great site.
The Craftsman gun definitely works for small and medium sized jobs. Coating those cups will be a breeze. I don't really see anything special about the Eastwood "oven". It appears to just be a re-branded kitchen toaster oven. For the same price, you can get the largest toaster oven I could find and I searched awhile: http://www.amazon.com/gp/product/B004USWRA4/ref=as_li_qf_sp_asin_tl?ie=UTF8&camp=1789&creative=9325&creativeASIN=B004USWRA4&linkCode=as2&tag=powcoathecomg-20. It is larger in every dimension.
DeleteAs with any metallic object you powder coat it, you should ground it. I would personally ground it on the inside instead of the bottom, assuming you don't plan to powder coat the inside. Because they are stainless, it is very possible that a magnet will not stick to them at all. If it is possible to hang them (looks difficult), just ground the hanging hook. Also I see they are insulated, do you know if the insulation will stand up to the heat?
I have been looking endlessly for a small oven. Just wondering which oven you went with?
DeleteHey Sean castle first of all thanks for all the new info it's great..I am about to start a small powder coating business an I already got some of the more expensive equipment like the 60 gallon compressor a ND the sand blaster but I was thinking of buying a good powder coat gun that would do a good job until I had the money to buy a professional gun do you think the (Powder Coating Gun System ES01-C Spectracoat) would do it its 700 dollars
ReplyDeleteI am more of a fan of the Hypersmooth 02 powder coating gun. It often gets much better reviews than the Spectracoat and its in the same price range and has the same features.
DeleteI'm looking to upgrade from the Dual voltage Eastwood gun. I want a gun that can do multiple coats and has a good feed system. Also, is there a glove you can use to handle hot parts out of the oven? Thanks!
ReplyDeleteI used to highly recommend the Redline EZ50 as the next gun to buy after the Eastwood type guns but I have heard from others that the quality isn't what it used to be. If you can find one built before 2013, then that would be a good choice. Otherwise, the Hypersmooth guns are very good for the price.
DeleteRedline ez50 looks a lot like Eastwoods hot coat pro gun. What are your thoughts on hot coat pro?
DeleteI haven't used one but they look identical to the EZ50. I have heard good things about them so if you can get your hands on one, they would be a good gun for the price. They aren't sold by Eastwood anymore so your best bet would be to check ebay and wait for one to pop up.
DeleteHi, I'm from General Coating Technologies, China. We manufacture professional guns, but at beginner's price. Look at our catalogue ( www.PowderCoater.cn ) and let us know if you have any inquiry. Thanks!
ReplyDeleteYou should add a bitcoin address to your blog. You are giving out great info I would love to donate.
ReplyDeleteGreat info, nice site. Thanks a ton for putting it up. FWIW, I use an old HF gun and I'd have to say it works "pretty good." I frequently wonder what a nicer gun would do for me but given the infrequency with which I coat it's hard to beat at the price!
ReplyDeleteThanks again for putting all this out there- it's really helpful.
Hi Sean. I bought an EZ50 gun, and it came in a few days ago. Unfortunately, the air control has an adapter that came with it, that I can't really use. It's an odd size for a rubber hose that's not a standard US size. I thought the size on the gun was an 1/8" F NPT. But it's not. It's also not a 10mm, or a BSPP. For the life of me, I can't figure out what it is.
ReplyDeleteI'm trying to get to a female 1/4" pipe socket so I can attach the air filter, and then the industrial male fitting to the industrial socket.
Since you seem to have this gun, I'd like to know what you've done with it. I had also been hoping for a review.
Yes its an odd thread size. The adapter I needed and I assume is the same one you need (I bought mine years ago) is Grainger item 1CPD7 adaptor / reducer
Delete1/8-27 NPT to 1/8-28 BSPP. It was only like $3 and I bought it at a local Grainger store. Hope that helps.
Yeah, that helps. McMaster Carr has one too. I bought three to have some spares, and three female 1/8" NPT to 1/4" female BPT for the industrial fitting to go into. You'd think that if they're selling the the US they would include a US fitting. It's hard to believe that they don't have the adaptors in 1/4" female NPT size, which is standard for us here.
DeleteUnfortunately the company is based out of India, and it seems India is their primary market. Only recently did they update the U.S. guns to include a plug that actually fits U.S. outlets. Before they required an adapter. This is why they have an oddball thread size and ideally, this would have been corrected before selling in the U.S. but it is an easy enough fix. It is still a great gun at that price point and it is a favorite among more serious hobbyist powder coaters. You can even find people using it as a backup gun in powder coating shops where their main gun is a $5000 Gema.
DeleteWell, they've done something very bad with this latest version of the power supply. I'm not even sure they know it.
DeleteI read a post somewhere, not sure if it was here, or in another powder forum, where a guy was complaining the the gun shocked him, and the company said it was bad grounding. That's only partly true. I was surprised to find that the power supply has no grounding pin. The manuals clearly state to plug this into a grounded outlet, and to make sure all grounds are good.
But with no grounding plug, that can't be done. I was wondering how they accomplished a ground here. The ground wire for the object being painted comes from the plug screwed into the gun itself, rather than from the power supply, which is the common method. I thought they were somehow generating an internal ground, but they're not.
Just to duplicate what the guy in the forum did, I tried the gun with clipping the ground to the rod where the parts are hung, and sure enough, as soon as I pulled the trigger, I got a mild shock. What needs to be done is to ground the hanging rod, or whatever else the parts are grounded to, directly to a ground, and then to clip the wire from the gun to the rod. That works fine.
This is disturbing. I've designed a lot of electronics over the years, professionally, and grounding is a major headache. But I've found that sometimes, Chinese manufacturers (they buy their power supplies from a Chinese manufacturer) will substitute other ways of doing what you spec, and so you need to keep on top of them. I wouldn't be surprised if Redline doesn't even know about this, and that their employees are doing what employees always do, which is to get the parts and pack them without bothering to pay any attention to what they look like.
I'm going to send them an e-mail, but as they didn't reply to the one about the adapter, I'm not sure what will happen to this one. But I'm concerned that someone will get hurt.
Thank you for posting about this. I have revised my recommendation on this website with the issue you mentioned. After doing some searching, I see that you are not the only one to experience this. While it is always best to ground the parts directly to a ground rod, this is unacceptable. I do not have any experience with the newer EZ50's but I have never had a problem with the one I bought several years ago. I hope that you get a response from them and they try to do something to help you out.
ReplyDeleteI will also send them an email as I have been recommending them for a couple of years now.
Fortunately, a change in the instructions for grounding will work. People just have to know that the ground of the parts holders now need to be connected directly to a grounded electrical box, and that the ground wire from this needs to go to an already grounded place connected to that box.
DeleteI received a reply from Redline on this issue which you can read below. You are correct. The gun is now grounded through through the alligator clip. So for the gun to be grounded, it must be connected to a ground source.
DeleteReply:
"Grounding of the gun:
The earlier power supply had 3 pins with the third pin purportedly for grounding. Inside the power supply unit, the connection was taken out trough to the other end and attached to [1] the ground cable with croc clip and [2] the gun. Due to performance issues we had with this power supply, we had to redesign our requirement. Now, the gun is directly provided with the ground cable and croc clip. Hence, as long as the user uses the ground cable with croc clip provided to him, the gun is properly grounded.
Please note that in either case, with the third pin or without, the croc clip grounds the gun.
In most cases where the coater get a "shock", it is because he (the coater himself) is not grounded. He needs to be made critically aware (our Owner's Manual clearly states this) that wearing any kind of insulating material soled shoes will render him un-grounded. When that happens, charge builds up on his body and when he touches any grounded part (like the gun body which is grounded), this charge discharges creating what they feel as a "shock". Mpost footwear available today have a polyurethane or PVC sole rendering the wearer insulated from the ground and hence open to sudden electrostatic discharges. If you come across anyone who gets these "shocks", please teach them that the gun needs to be grounded using the croc clip and they themselves need to be grounded equally well (ideally without any footwear or with leather-soled footwear)."
Well, that's interesting. But the manual reads as though the power supply is grounded. As we can see, it's not. It's irresponsible to change the way the grounding works without stating so in the manual. Nowhere does it say that the power supply is not grounded. It does state that it needs to be plugged into a grounded outlet. That's wrong.
DeleteI do agree about the shoes, but that's not a reliable solution to anything. There's no guarantee that wearing leather shoes will lead to grounding the operator, particularly in winter conditions. The only thing that works is now making sure the part holder is itself grounded, and that the gun ground is attached to that grounded part.
I also just bought the Creaftsman/WEI machine. Interesting. There's this guy whose made cups for it on his 3D printer. He publishes the cad files. He's made files for bigger cups too. Very interesting stuff. I might try to make a couple, but with clear plastic.
ReplyDeleteThis gun seems good to make color samples without loading the bigger guns.
Yes I have seen those 3D printed cups before over on cnczone. Very cool stuff. I still keep my craftsman gun around for quick jobs. I plan to do a video series using that gun soon. If you want to see the original discussion, heres the link: http://www.cnczone.com/forums/benchtop-machines/111863-hosss-g0704-358.html , starts at post 4295 I believe and goes on from there.
DeleteIf I had access to a 3D printer, I would definitely print a couple of those things for myself. I really like how the extended capacity cup has a screw on lid. My biggest gripe about the Craftsman gun is how tight the factory lid fits. IF there is any powder at all in the grooves, it won't turn all the way.
Also, there are no o rings in the o ring grooves in the large opening when the rear is removed, or the small groove where the air comes in. I've added o rings in these places. I've read some complaints that this gun bleeds powder, and that could be the reason. The grooves don't match up exactly to o ring sizes, but I've found Dash numbers that are close enough.
DeleteI like the extended cup ideas myself, but I wonder if the air inlet, and the powder outlet will be in the right places. The relationship between the two are fairly critical. As it is, the manual says that gently shaking the gun while using it will result in a better coating.
I personally never had an issue with my gun leaking powder but as long as the o-rings don't cause any gaps, it should only help. Good idea!
DeleteI believe that he kept the inlet and outlet in their original positions and just added the storage capacity on the bottom. Whether the extra powder on the bottom is usable considering the original design didn't plan for that extra capacity is anyone's guess. As long as it is usable, I would love to have one of those cups. Even it if did affect the powder cloud, I don't think it would matter much. This gun's cloud is pretty sporadic as is.
Have you decided to ditch the EZ50 in favor of the Craftsman gun?
Oh no! I'm buying a few different guns for different uses. I began with the Harbor Freight gun because it was cheap, and I was just starting out with having bought a Black and Decker toaster oven for the purpose. Made a small spray booth out of a cardboard box with an acrylic top and a small under shelf fluorescent light.
DeleteI couldn't hang anything because of the oven size, so I made a turntable to put stuff on when spraying, as I didn't need to spray the bottom of the stuff I was doing.
Since everything went so well, I decided to take it out of my basement shop and into my garage shop where my 14' lathe is. So I bought a Blue-M lab oven on eBay with a 28w X 17.5" h X 16" deep interior. That made me sit down to figure out a better spray booth. Temporarily, I've got a much bigger one built, and when the rest of the materials for the "real" one finish coming in, I'll build that.
The idea was that the EZ50 would be a much better gun. I've had some problems with Faraday cage effects, though the low voltage of the HF gun has made that easier. I'm going to try some things. One is to give a positive charge to the parts themselves rather than just relying on the ground. I've done some math and see no problem there. That will also allow me to change the amount of charge, and reverse it too. I've got some odd ideas here, but I may as well try them.
I couldn't turn down the Craftsman gun for $50 including shipping. I'm a sucker that way. I figured that when I buy powder for which I don't have a sample chip, I'll use that gun for that, as well as small stuff. I bought three sample books from Spectracoat. I'm a sucker for that too.
I have two friends who are small audio manufacturers, and we're discussing my doing their chassis. I shot 36 transformer end bells for one, and I wasn't thrilled with the slight orange peel on that black gloss (he thought it looked fine). I was thinking of buying a tribo gun for that. What a pain. Whenever I get involved in something, I can't leave well enough alone.
Oops, I forgot the link.
ReplyDeletehttp://www.thingiverse.com/thing:113313
What type of gun works with Nylon powders?
ReplyDeleteDepends on the powder. Some require a positive charge, some a negative charge, and some will work with a Tribo gun. You've got to ask the manufacturer. These powders are very expensive.
DeleteWe use Nylon 11 powder. We have a hard time with adhesion with certain colors. I am in the process of making a grounding rod like the one you have.
DeleteQuestion, would low kv such as the 15 from the eastwood gun give you powder pull when baking? Long story but in short, I have a grounding rod and a original Eastwood gun (15kv). I've tried the two step or shoot wait till it flows than shoot light spots. Yet it still turns out the same. Pulls from the edges and starts moving towards the bottom.
ReplyDeleteThe only luck I've really had was curing at 100 degrees less then recommended which still kind of pulls. The powder is recommended to be shot at 45kv.
I've had lots of suggestions from the powder365 forum but nothing has worked yet.
If you want I've posted pics on there under topic "kilovolts vs lack there of" and my user name is SteveC.
Might pick up Caswells HV gun but it sounds like you know your stuff so I thought I'd ask.
Thanks
Steve, this is a complex area. All high voltage guns have orange peel problems to a greater, or lesser, degree. The problem isn't the particular voltage used, but the way the gun emits the powder and the electrons. The problem comes from the "spill" of electrons at the outer edge of the powder cloud. Those electrons aren't associated with powder particles, but reach the item by themselves.
DeleteThose un-associated electrons attempt to move away from each other on the surface, resulting in clumps. Those clumps end up as orange peel. Fortunately, it's mostly a problem with just glossy finishes.
If you're having a major problem with this, I suggest a Tribostatic gun and powders. That doesn't use a high voltage source, and has no orange peel problem, or Faraday Cage problem, which is when powder doesn't go into recesses.
Sorry for the late reply, I have been swamped with work lately. I went through your post and saw the issue. It looks like you may be shooting the parts too heavy and but the edge pull can happen even if you shoot them light. I see that you checking your part with a LED light so that is good. Edge pull is often caused by the flow agents in high-gloss powders. The Caswell gun might help your overall powder coating but it is not likely to solve this issue. I have tried several different methods to counteract this including smoothing edges on the part before coating and a slow ramp up to the cure temperature. Neither seemed to help too much but I did find something that works for me and gives excellent results.
DeleteFirst I spray the part very lightly, just enough to achieve full coverage. If I am fighting a tiny faraday area, I just ignore it. Put the part in the oven and let powder flow out (around 200 degrees). I then pull the part out of the oven and immediately spray it with the lightest possible coat I can while it is still hot, making sure to cover any missed faraday areas. I then put it back in the oven.
If you do this right, you will have very minimal orange peel and no edge pull. However, if you spray the powder too heavy, it is very easy to cause runs doing this. Because the part is hot, the powder will stick very well so it is easy to pile on too much. This is the only circumstance where I will recommend spraying the part hot.
The main thing that the kv is limiting you on is the powder transfer efficiency. With 15kv max, less powder will reach the part than if you were able to shoot with 40-60kv. Instead, more ends up on the bottom of your booth. However, once the powder is on the part and in the oven, the kv's matter very little.
I hope this helps. I would recommend doing some practice runs. I usually use soup cans to practice, and they have a lot of sharp edges so you'll really be able to see if it is working for you.
Very efficient written information. It will be beneficial to anybody who utilizes, including me. Keep up the good work. For sure I will check out more posts.
ReplyDeleteThis just proves that I still have lots of things to learn not to mention there are more power tools that we can use! This is great and will keep an eye when I can use this for my projects.
ReplyDeleteSean, thank you for all of the great info. I'm having trouble getting acceptable results with the Craftsman gun so I'm looking forward to your series on using it.
ReplyDeleteWhat kind of issues are you experiencing with the Craftsman gun?
DeleteThe best advice I can give you for using it is to ditch the green grounding wire on the gun and instead ground your parts with a grounding rod (read "How to Properly Ground Your Parts). This allows powder to be more easily sprayed into the tighter areas.
Another piece of advice is to feather the trigger. You don't always need to be spraying full blast. In most cases, you can put on a smoother coat of powder with the trigger partially depressed. This also helps to get powder into the tighter areas.
Hi Sean! This is Anil here
ReplyDeleteThanks for the information that is provided here.
Can you tell what is the Electrostatic Voltage in that craftsman gun kit?
Any idea on Fluidized Bed Powder Coating process? If so why dont you share that here.
If would be very interesting for readers too.
The KV of the Craftsman system is not published anywhere that I can find but it is rumored to be around 12KV. If that is true, it is surprising that it actually transfers any powder to the parts but it does so well enough.
DeleteI have a vague understanding of fluidized bed powder coating but just what I have read about online. I have never actually seen the equipment in person though as it is a lot more specialized than the average powder coating gun. It is also much less common. I don't think I could write enough about it to do an entire article but I think I'll include some info about it in another article just so people are aware that it exists.
Powder coating is really cool looking. It takes a lot of attention to do it because you do not want to mess it up. I had no idea that they had powder coating guns. I thought they just threw powder.
ReplyDeleteFrom the above article:
ReplyDelete"They also come with Eastwood's instruction manual, a manual which you should ignore for the most part as there is some information in it that is flat out wrong and coaters have been asking them to change it for awhile now. "
Are you referring to the Eastwood Powder Coating Beginner's Guide?
http://www.eastwood.com/eastwood-beginner-s-powder-coating-handbook.html
Just wondering if this guide is worth getting ($20) or if it's the one with the misinformation you mentioned. Have they corrected the errors yet?
P.S. If this is the manual you were referring to, it is apparently no longer included with the gun and must be purchased separately.
Great Site. Thanks in advance!
There used to be instructions that came packaged with the Eastwood gun that had some misinformation. I don't know if they ever got around to changing their literature though. I personally wouldn't purchase or follow their powder coating manual. Their powder coating guns work decently enough for hobby powder coating, but I recommend that you get your information elsewhere. Information on this website alone probably covers about 500% more than the Eastwood manual. Other good resources for information are the Powder Coating Institute and forums like powder365's.
DeleteI am using the EZ 50. It works great for me so far, but I am shopping now for higher end equipment. I've coated Polymer and ceramic liquid spray on's all my life, and now I am starting powder at home and am getting busy fast.
ReplyDeleteI'm using the harbor freight gun, it's okay, but having issues with second coats not wanting to stick, I put a ground rod in to see if it would improve, but no luck. Thinking about a better gun. What are your thoughts. Would like to do professional work.
ReplyDeleteThe harbor freight gun works just good enough for a hobbyist and you will have to fight with it when doing multiple coats. If you want to do professional work, then the bare minimum would be a Redline EZ50 gun. A good step up from that would be a Hypersmooth Es03, but ideally, you should look at an actual professional level powder coating gun from Gema, Wagner, or Nordson.
DeleteHello thank you for putting this info up. I just had a question about guns. I have the eastwood dual voltage gun and as I am just starting out I was wondering if it could handle doing wheels? I know you've stated the ez50 gun is the way to go but can the eastwood do it until I can afford a better gun?
ReplyDeleteAn Eastwood Dual Voltage gun is capable of doing wheels. You may have to fight some frustrations with faraday cage areas and some powder spitting here and there but it is do-able. At the price-point the Eastwood gun sells at, it is great for a home powder coater that occasionally does powder coating work. I would upgrade to a better gun if you plan on doing paid work for others though.
DeleteThanks for the info. I plan on doing small projects until I can save up for a better gun. We all have to start somewhere.
DeleteCan you link to professional guns please? I'd much rather buy a quality gun rather than one that can't do all that I need. Thanks for your time.
DeleteI have the single voltage Eastwood gun and the usual Faraday problems. Would it work like a tribo if I just shut off the voltage and only use air ?
ReplyDeleteUnfortunately, it doesn't work like that. The voltage is what attracts the powder to the part and without it, the only thing transferring powder to the part is air pressure.
DeleteYou can try the following to help with the faraday issues:
-install a grounding rod with as few connections possible and connect it directly to your part.
-try spraying the faraday areas first before coating the rest of the part.
-try spraying the faraday areas indirectly.
-try heating the part up before spaying, not too much, just about 115 degrees.
Sean, great web-page. Lots of good info in here. The question I have is how do I make the leads from my "Eastwood" dual voltage gun longer. Seems that I'm always pulling the control box off into the floor. I have not taken it apart yet to see if can. (Guess I should do that first before posting.) Same for the current button too. I do plan on adding a extra grounding wire. As you can see.....I'm a beginner. So this may be a stupid question.
ReplyDeleteThanks for your knowledge and letting others benefit from it.
Hump.
I want this gun! Seems like a really handy equipment for powder coating!
ReplyDeleteHi Chris, is there anything you can tell me about the Wx-958 Powder Coating System Machine Equipment 55l Volume Sprayer. I am unable to find much more than the specifications and price range. Any assistance in this matter would be greatly appreciated.
ReplyDeleteThank you,
Mike
Sean, I would like to apologize for the aforementioned inquiry regarding the WX-958 Powder Coating System Machine Equipment 55L Volume Sprayer. It was published as ‘Annonymous’ on April 8, 2018 at 9:34 PM signed by ‘Mike’ and addressed to ‘Chris’. My apology is for addressing the question to Chris when it should have been addressed to Sean (Yourself) I’m not really sure where I got the name Chris but I can assure you it won’t happen again. Although, if in fact you have any information regarding the system I am inquiring about it would be greatly appreciated.
ReplyDeleteSincerely,
Mike
Hi, any experience with a colo 660?
ReplyDeleteI have never used it but what do you want to know about it?
DeleteWow. Nice informative site! Quick question. I see several PC03-05 guns with variable kw ratings. 30-50 I believe. These look like a good deal but I can find almost no reviews at all on these guns. Any ideas?
ReplyDeleteThanks,
Wayne
Sean, How would you go about coating a ball-joint? Keep in mind that it is filled with grease and no way to clean out.
ReplyDeleteThanks,
Phil
Unfortunately, you won't be able coat a ball-joint without disassembling it, cleaning all of the grease out, and then re-assembling it. Unless you have access to the equipment to do that, liquid paint would probably be a better option.
DeleteThank you for sharing this wide and information. As I found your blog, now it seems like I can do it myself. Keep sharing good things! I'm going to follow you.
ReplyDelete